Electrical connections are the most critical and underrated elements of any electrical system. Poor or inadequate connections not only lead to unreliable operation, but can also become a serious fire hazard. In fact, a large proportion of fires are caused by electrical faults, which makes properly made connections a fundamental safety requirement, not just a matter of performance. I have seen many people make mistakes when creating electrical connections, leading to system malfunctions, long and frustrating fault-finding processes, and in the worst cases, fires.
It doesn’t have to be complicated—making reliable electrical connections is actually quite straightforward if you know a few key details to watch for.
System architecture
It all starts at the design stage. Electrical connections must be sized according to the current they are expected to carry. For the same load power, higher system voltages (12 V, 24 V, 48 V) result in lower currents. For example, connecting a 1.2 kW inverter to a 12 V system draws around 100A, while on a 24 V system the current is roughly halved to about just 50A. Lower current means less stress on both the connectors and the wiring for the same load. If you plan to use more than one battery, it could be worth considering going with a higher voltage DC system.
Obviously when you are making the connections to the load itself, the method on connection is determined on the device itself. In those cases don’t forget to check the manual.
High current connections (>30A)
These connections can be especially dangerous if they are not done correctly, which makes getting them right absolutely critical. From a design perspective, it is essential to minimise the number of connections wherever possible—fewer connections mean fewer potential points of failure. (affiliate links):
- Avoid having multiple cable lugs on top of eachother
- Use busbars for distributing high currents instead
- Use copper busbars to connect the batteries to eachother if possible
- Avoid using multiple seperate high current fuses
- Use fused high-current distribution blocks instead
In practice, these connections are most often made using cable lugs crimped onto the cables. To form a reliable cable-lug connection, the lug must be the correct size for the cable and it must be crimped correctly. Most issues arise from the crimping itself, and they are usually caused by not using the proper crimping tool.
Use either a hydraulic crimping tool or a manual crimper with long handles.
Both are inexpensive nowadays and are capable of producing proper, reliable crimps, you just can’t put a pricetag on safety. Avoid hammer-type crimping tools, and never use a vise for crimping.
On short runs you may be able to use a copper busbar instead of a short cable with crimped cable lugs on both ends. Both crimps on the cable add an additional connection point, so you can potentially save two failure point by using a copper busbar! Don’t forget to insulate the busbar where it does not need to be exposed!
Make sure to properly tighten every bolt and nut on these connections, as they provide the only clamping force holding the connection together. Use anti-loosening measures such as double-nutting or spring washers. Avoid nylon lock nuts, since the plastic can melt if the connection heats up, causing it to lose its retaining ability. Regularly check the tightness of these connections, as they can loosen over time due to vibration or repeated heating and cooling cycles.
Case study: Below is a factory supplied cable for a load, wich has a current consuption of 40A.
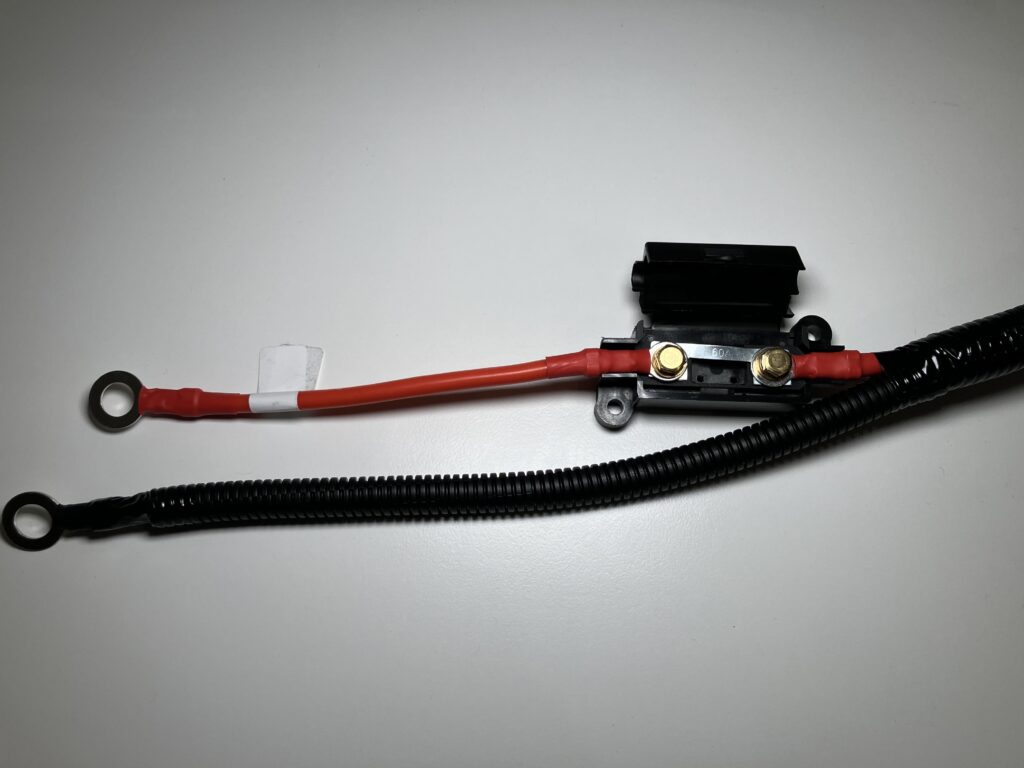
This cable is designed to be connected directly to a battery, and it is great for that. But, if you want to connect this to your system, and you already have a fused high current distribution block, you can remove some unnecessary connections by removing the inline fuse, and connecting the load directly to your distribution block with a suitable cable lug. This way you just removed 4 connections! Yes, I count the crimps as well. Any of these connections could fail over time, so removing 4 potential failure points is huge, and this is just one load! Also, I don’t trust that “fuse”, I won’t be using it.
Low current connections (<30A)
Most of the aspects told before apply here as well, but at lower currents there are lot more options for making good connections. Still try to minimize the number of connections in a circuit, and make use of power distribution products, like these bladed fuse distribution blocks. There are multiple versions of these fuse blocks, but I strongly recommend choosing one with screw terminals. To connect to this fuse block use instulated fork terminals, with the proper crimping tool. I highly recommend the terminals with heatshrink insulation. Be sure to use the proper sized terminals for the wire. Do not jam bare wires into these screw terminals, they are not wire-clamp type terminals.
I do not recommend using spade terminals, as I find them unreliable. Over time, they can lose their spring tension, loosen, and ultimately fail—sometimes even causing a fire. Use ring, or fork terminals, or even WAGOs instead.
WAGOs
I can’t recommend WAGOs highly enough—they’re brilliant. Easy to use, requiring no special tools, and almost impossible to get wrong, they provide the best wire-to-wire connections.
They come in a couple of different flavours, my favourite is the inline connector. The smaller ones accept wires up to 4mm^2 and rated at 32A, but there is a larger version which accepts up to 6mm^2, which are rated at 64A.
When making a junction using these WAGO connectors, put them in a small junction box.
Use these wherever you can, you just can’t go wrong with them, just be sure to use their original quality products, and not knock-off ones.